CHAPTER VII
THE GRAIN OF THE WOOD
Obstinacy of the Woody Fiber - First Exercise in Grounding - Description of Method - Cutting the Miters - Handling of Tools, Danger of Carelessness - Importance of Clean Cutting.


It is curious to imagine what the inside of a young enthusiast's head must be like when he makes his first conscious step toward artistic expression. The chaotic jumbles of half-formed ideas, whirling about in its recesses, produce kaleidoscopic effects, which to him look like the most lovely pictures. If he could only learn to put them down! let him but acquire the technical department of his art, and what easier than to realize those most marvelous dreams. Later in his progress it begins to dawn upon him that this same technical department may not be so very obedient [70] to his wishes; it may have laws of its own, which shall change his fairy fancies into sober images, not at all unlike something which has often been done before by others.
But let the young soul continue to see visions, the more the better, provided they be of the right sort. We shall in the meantime ask him to curb his imagination, and yield his faculties for the moment to the apparently simple task of realizing a leaf or two from one of the trees in his enchanted valley.
With the student's kind permission we shall, while these lessons continue, make believe that teacher and pupil are together in a class-room, or, better still, in a country workshop, with chips flying in all directions under busy hands.
I must tell you then, that the first surprise which awaits the beginner, and one which opens his eyes to a whole series of restraints upon the freedom of his operations, lies in the discovery that wood has a decided grain or fiber. He will find that it sometimes behaves in a very obstinate manner, refusing to cut straight here, chipping off there, and altogether seeming to take pleasure in thwarting his every effort. By and by he gets to know his [71] piece of wood; where the grain dips and where it comes up or wriggles, and with practise he becomes its master. He finds in this, his first technical difficulty, a kind of blessing in disguise, because it sets bounds to what would otherwise be an infinitely vague choice of methods.
We shall now take a piece of yellow pine, free from knots, and planed clean all round. The size may be about 12 ins. long by 7 ins. wide. We shall fix this to the bench by means of two clamps or one clamp and a screwed block at opposite corners. Now we are ready to begin work, but up to the present we have not thought of the design we intend executing, being so intent upon the tools and impatient for an attack upon the silky wood with their sharp edges.
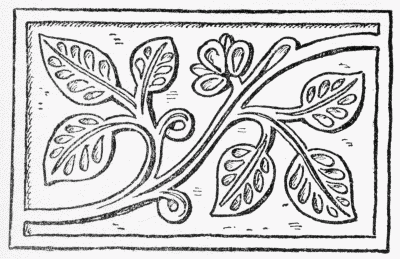
Fig. 13. The illustration, Fig. 13, gives a clue to the sort of design to begin with; it measures about 11 ins. long by 7 ins. wide, allowing a margin all round. The wood should be a little longer than the design, as the ends get spoiled by the clamps. This little design need not, and indeed should not, be copied. Make one for yourself entirely different, only bearing in mind the points which are to be observed [72] in arranging it, and which have for their object the avoidance of difficulties likely to be too much for a first effort. These points are somewhat to this effect: the design should be of leaves, laid out flat on a background, with no complication of perspective. They should have no undulations of surface. That is to say, the margins of all the features should be as nearly as possible the original surface of the wood, which may have just the least possible bit of finish in the manner I shall describe later on. The articulation of the leaves and flower is represented by simple gouge cuts. There should be nothing in the design requiring rounded surfaces. The passage for tools in clearing out the ground between the features must not be less than 1/4 in.; this will allow the 3/16 in. corner grounder to pass freely backward and forward. The ground is supposed to be sunk about three-sixteenths of an inch.
As you have not got your design made, I shall, for convenience' sake, explain how Fig. 13 should be begun and finished. First having traced the full-size design it should be transferred to the wood by means of a piece of blue carbon paper. [73]
[74]
Then with either the Veiner or V tool outline the whole of the leaves, etc., about 1/8 in. deep, keeping well on the outside of the drawing. Ignore all minor detail for the present, blocking out the design in masses. No outline need be grooved for the margin of the panel at present, as it should be done with a larger tool. For this purpose take gouge No. 6 (1/4 in. wide), and begin at the left-hand bottom corner of the panel, cut a groove about 1/16 in. within the blue line, taking care not to cut off parts of the leaves in the process; begin a little above the corner at the bottom, and leave off a little below that at the top. The miters will be formed later on.
In this operation, as in all subsequent ones, the grain of the wood will be more or less in evidence. You will by degrees get to know the piece of wood you are working upon, and cut in such a way that your tool runs with the grain and not against it; that is to say, you will cut as much as possible on the up-hill direction of the fiber. This can not always be done in deep hollows, but then you will have had some practise before you attempt these.
Now take chisel No. 11, and with it [75] stab into the grooved outline, pressing the tool down perpendicularly to what you think feels like the depth of the ground. The mallet need not be used for this, as the wood is soft enough to allow of the tools being pressed by the hand alone, but remember that the force must be proportioned to the depth desired, and to the direction of the grain; much less pressure is wanted to drive a tool into the wood when its edge is parallel with the grain than when it lies in a cross direction; small tools penetrate more easily than large ones, as a matter of course, but one must think of these things or accidents happen.
When you have been all round the design in this way with such gouges as may be needed for the slow and quick curves, get the wood out nearly down to the ground, leaving a little for finishing. Do this with any tool that fits the spaces best; the larger the better. Cut across the grain as much as possible, not along it. The flat gouge, No. 1, will be found useful for this purpose in the larger spaces, and the grounders for the narrow passages. This leaves the ground in a rough state, which must be finished later on. [76]
Now take gouges Nos. 2, 3, 4, 5, 6, 7, and chisels Nos. 10, 11, 12, and with them cut down the outline as accurately as possible to the depth of the ground, and, if you are lucky, just a hair's breadth deeper. In doing this make the sides slope a little outward toward the bottom. If the gouges do not entirely adapt themselves to the contours of your lines, do not trouble, but leave that bit to be done afterward with a sweep of the tool, either a flat gouge, or the corner-chisel used like a knife.
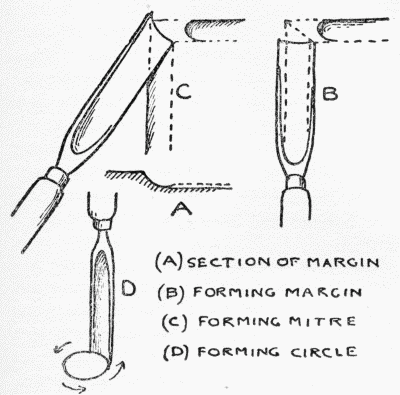
Now we have all the outline cut down to the depth of the background, and may proceed to clear out the wood hanging about between the design and the ground all round it. We shall do this with the "grounders," using the largest one when possible, and only taking to the smallest when absolutely necessary on account of space. This done, we shall now proceed to finish the hollow sides of the panel and make the miters. Again, take No. 6 gouge and drive a clear hollow touching the blue line at end of panel, and reaching the bottom of the sinking, i.e., the actual ground as finished, see a, Fig. 15. To form the miter at top of left-hand side of panel, [77] carry the hollow on until the tool reaches the bottom of the hollow running along the top; as soon as this point is gained, turn the tool out and pitch it a little up in the way shown at c, Fig. 15, in which the tool is shown at an angle which brings the edge of the gouge exactly on the line of the miter to be formed. Beginning as it does at b, this quick turn of the handle to the left takes out the little bit of wood [78] shown by dotted lines at b, and forms one-half of the miter. The cross-grain cut should be done first, as in this way there is less risk of splintering. Now repeat the process on the long-grain side of the panel, and one miter is in a good way for being finished.
A word now about these sides of sunk panels. They always look better if they are hollowed with a gouge instead of being cut square down. In the first case they carry out the impression that the whole thing is cut out of a solid piece of wood, whereas when they are cut sharply down they always suggest cabinet-making, as if a piece had been glued on to form a margin.
We have now got the work blocked out and the ground fairly level, and we are ready to do the little carving we have allowed ourselves. Before we begin this I shall take the opportunity of reminding you that you must be very careful in handling your tools; it is a matter of the greatest importance, if the contingency of cut fingers or damaged work is to be avoided. The left hand in carving has nearly as much to do as the right, only in a different way. Grasp the chisel or gouge [79] in the left hand with the fingers somewhat extended, that is, the little finger will come well on to the blade, and the thumb run up toward the top of the handle; the wrist meanwhile resting on the work. The right hand is used for pushing the tool forward, and for turning it this way and that, in fact does most of the guiding. Both hands may be described as opposing each other in force, for the pressure on the tool from the right hand should be resisted by the left, until almost a balance is struck, and just enough force left to cut the wood gently, without danger of slipping forward and damaging it or the fingers. The tool is thus in complete command, and the slightest change of pressure on either hand may alter its direction or stop it altogether. Never drive a tool forward with one hand without this counter-resistance, as there is no knowing what may happen if it slips. Never wave tools about in the hand, and generally remember that they are dangerous implements, both to the user and the work. Never put too much force on a tool when in the neighborhood of a delicate passage, but take time and eat the bit of wood out mouse-like, in small fragments. [80]
Now we are ready to finish our panel. Take the grounders, according to the size required, always using the biggest possible. Keep the tool well pressed down, and shave away the roughness of the ground, giving the tool a slight sideway motion as well as a forward one. Work right up to the leaves, etc., which, if cut deep enough, should allow the chips to come away freely, leaving a clear line of intersection; if it does not, then the upright sides must be cut down until the ground is quite clear of chips. Grounder tools are very prone to dig into the surface and make work for themselves: sharp tools, practise, and a slight sideway motion will prevent this. Tool No. 23 is useful in this respect, its corners being slightly lifted above the level of the ground as it passes along. Corners that can not be reached with the bent chisels may be finished off with the corner-chisel.
Now we come to the surface decorations, for the carving in this design consists of little more. This is all done with the gouges. Generally speaking, enter the groove at its widest end and leave it at the narrowest, lowering the handle of the tool gradually as you go along to lift the [81] gouge out of the wood, producing the drawing of the forms at the same time. A gouge cut never looks so well as when done at one stroke; patching it afterward with amendments always produces a labored look. If this has to be done, the tool should be passed finally over the whole groove to remove the superfluous tool marksa sideway gliding motion of the edge, combined with its forward motion, often succeeds in this operation. To form the circular center of the flower, press down gouge Nos. 5 or 6, gently at first and perpendicular to the wood. When a cut has been made all round the circle, work the edge of the tool in it, circus-like, by turning the handle in the fingers round and round until the edge cuts its way down to the proper depth. (See A, Fig. 15.)
Carve the sides of the leaves where necessary with flat gouges on the inside curves, and with chisels and corner-chisels on the outside ones. These should be used in a sliding or knife-like fashion, and not merely pushed forward. Finish the surface in the same manner all over between the gouge grooves and the edges of the leaves, producing a very slight [82] bevel as in section a, Fig. 13, and this panel may be called finished.
Fig. 14 is another suggestion for a design, upon which I hope you will base one of your own as an exercise at this stage of your progress.
Before we begin another, though, I shall take this opportunity of reading you a short lecture on a most important matter which has a great deal to do with the preparation of your mind in making a suitable choice of subject for your future work.
TABLE OF CONTENTS | INDEX OF TOPICS

|
INFORMATION ABOUT HOW TO MAKE MONEY FROM WOOD CARVING |