CHAPTER IX
ROUNDED FORMS
Necessity for Every Carver Making his own DesignsMethod of Carving Rounded Forms on a Sunk Ground.
CLICK HERE CLICK HERE [89]
Fig. 16, our second exercise, as the first one, is only to be taken as an example of a design to be made by yourself. It is a fundamental principle of the art of woodcarving, that both design and execution should be the work of one and the same person. Therefore, I want you to begin by strictly adhering to this rule. It was indeed one of the main conditions of production in the best times in the history of woodcarving, and I am certain that it must again come to be the universal rule if any real progress is to be made in the art of wood-carving, or in any other art for that [90] matter.
Imagine for a moment how false must be the position of both parties, when one makes a "design" and another carries it out. The "designer" sets his head to work (we must not count his hands at present, as they only note down the results in a kind of writing), a "design" is produced and handed over to the carver to execute. He, the carver, sets his hands and eyes to work, to carry out the other man's idea, or at least interpret his notes for the same, his head meanwhile having very little to do, further than transfer the said notes to his hands.
For very good reasons such an arrangement as this is bound to come to grief.
One is, that no piece of carving can properly be said to be "designed" until it is finished to the last stroke. A drawing is only a map of its general outline, with perhaps contours approximately indicated by shading. In any case, even if a full-size model were supplied by the designer, the principle involved would suffer just the same degree of violence, for it is in the actual carving of the wood that the designer should find both his inspiration and the discipline which keeps it within reasonable bounds. He must be at full liberty to alter his original intention [91] as the work develops under his hand.
Apparently I have been led into giving you another lecture; we must now get to work on our exercise.
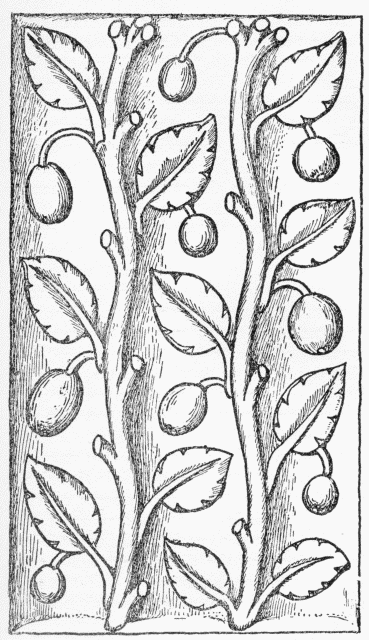
Draw and trace your outline in the same manner as before, and transfer it to the wood. You may make it any convenient size, say on a board 18 ins. long by 9 ins. wide, or what other shape you like, provided you observe one or two conditions which I am going to point out. It shall have a fair amount of background between the features, and the design, whatever it is, shall form a traceable likeness to a pattern of some description; it shall have a rudimentary resemblance to nature, without going into much detail; and last, it shall have a few rounded forms in it, rounded both in outline and on the surface, as, for instance, plums.
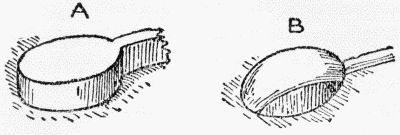
In setting to work to carve this exercise, follow the same procedure as in the first one, up to the point when the surface decorations began. In the illustration, there is a suggestion for a variety in the background which does not occur in the other. In this case the little branches are supposed to lie along the tops of gentle [92] elevations, and the plums to lie in the hollows. It produces a section something like this, Fig. 17. There is a sufficient excuse for this kind of treatment in the fact that the branches do not require much depth, and the plums will look all the better for a little more. The depth of the background will thus vary, say between 3/16 in. at the branches and 3/8 in. at the plums. The branches are supposed to be perfectly level from end to end, that is, they lie parallel to the surface of the wood, but of course curve about in the other direction. The leaves, on the other hand, are supposed to be somewhat rounded and falling away toward their sides and points in places. The vein in the center of the leaves may be done with a parting tool, as well as the serrations at the edge, or the latter may perhaps be more surely nicked out with a chisel, after the leaves have received their shapes, the leaves being made to appear as if one side was higher than the other, and as though [93] their points, in some cases, touched the background, while in others the base may be the lowest part. The twigs coming out from the branches to support the plums should be somewhat like this in section, and should lie along the curve of the background, and be in themselves rounded, as in Fig. 18, see section a a. The bottom of the panel shows a bevel instead of a hollow border: this will serve to distinguish it as a starting-point for the little branches which appear to emerge from it like trees out of the ground. The plums should be carved by first cutting them down in outline to the background, as A, Fig. 19. Then the wood should be removed from the edge all round, to form the rounded surface. To do this, first take the large gouge, No. 2, and with its hollow side to the wood, cut off the top, from about its middle to one end, and reversing the process do the same with the other side. Then it will appear something [94] like B (Fig. 19). The remainder must be shaped with any tool which will do it best. There is no royal road to the production of these rounded forms, but probably gouge No. 1 will do the most of it.
Here it may be observed that the fewer tools used the better, as if many are used there is always a risk of unpleasant facets at the places where the various marks join each other. Before you try the plums, or apples, or other rounded fruit which you may have in your design, it would be as well to experiment with one on a piece of spare wood in order to decide upon the most suitable tools. The stems or branches may be done with flat gouge No. 1, or the flat or corner chisel. A very delicate twist or spiral tendency in their upward growth will greatly improve their appearance, a mere faceting produced by a flat gouge or [95] chisel will do this; anything is better than a mere round and bare surface, which has a tendency to look doughy. The little circular mark on the end of the plum (call it a plum, although that fruit has no such thing) is done by pressing gouge No. 7 into the wood first, with the handle rather near the surface of the wood, and afterward at a higher inclination, this taking out a tiny chip of a circular shape and leaving a V-shaped groove.
Now I am going to continue the subject of my last lecture, in order to impress upon you the importance of suiting your subject to the conditions demanded by the laws of technique and light. Practise with the tools must go hand in hand with the education of the head if good results are to be expected; nor must it be left wholly to hand and eye if you are to avoid the pitfalls which lie in wait for the unwary mechanic.
TABLE OF CONTENTS | INDEX OF TOPICS


|