CHAPTER V
SHARPENING THE TOOLS
The Proper BevelPosition of Tools on OilstoneGood and Bad EdgeStroppingPaste and LeatherCareless SharpeningRubbing Out the InsideStropping Fine ToolsImportance of Sharp Tools.

CLICK HERE CLICK HERE
Having given this brief description of the tools and materials used by carvers, we shall suppose a piece of work is about to be started. The first thing the carver will require to do is to sharpen his tools. That is, if we may assume that they have just come from the manufacturer, ground but not yet brought to an edge. It will be seen that each has a long bevel ending in a blunt ridge where the cutting edge should be. We shall take the chisel No. 10 and sharpen that first, as it is the easiest to do, and so get a little practise before we try the gouges.
The oilstone and oil have already been described. The first thing is to well oil the stone and lay it on the bench in a position with its end toward the operator.
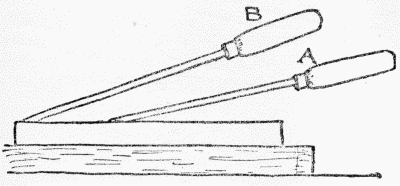
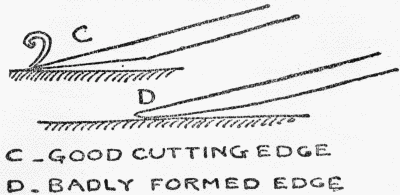
Tools which are going to be used in [53] soft wood require rather a longer bevel and more acute edge than when they are wanted for hard wood. Both angles are shown in Fig. 8. Lay the flat of the tool on the stone at an angle of about 15°, with the handle in the hollow of the right hand, and two fingers of the left pressed upon the blade as near to the stone as possible. Then begin rubbing the tool from end to end of the stone, taking care not to rock the right hand up and down, but to keep it as level as possible throughout the stroke, bearing heavily on the blade with the left hand, to keep it well in contact with the stone. Rocking produces a rounded edge which is fatal to keenness. [54] C (Fig. 9) gives approximately, to an enlarged scale, the sections of a good edge, and D that of an imperfect one.
Practise alone will familiarize the muscles of the wrist with the proper motion, but it is important to acquire this in order to form the correct habit early. It should be practised very slowly at first, until the hands get accustomed to the movements. When one side of the tool has been rubbed bright as far as the cutting edge, turn it over and treat the other in the same way. Carvers' tools, unlike joiners', are rubbed on both sides, in the proportion of about two-thirds outside to one-third inside. When a keen edge has been formed, which can easily be tested by gently applying the finger, it should be stropped on a piece of stout leather. It will be found, if the finger [55] is passed down the tool and over its edge, that the stoning has turned up a burr. This must be removed by stropping on both sides alternately. A paste composed of emery and crocus powders mixed with grease is used to smear the leather before stropping; this can either be procured at the tool shop, or made by the carver. When the tool has been sufficiently stropped, and all burr removed, it is ready for use, but it is as well to try it on a piece of wood first, and test it for burr, and if necessary strop it again.
Before we leave this tool, however, we shall anticipate a little, and look at it after it has been used for some time and become blunt. Its cutting edge and the bevel above it are now polished to a high degree, owing to friction with the wood. We lay it on the stone, taking care to preserve the original angle (15°). We find on looking at the tool after a little rubbing that this time it presents a bright rim along the edge in contrast with the gray steel which has been in contact with the stone. This bright rim is part of the polished surface the whole bevel had before we began this second sharpening, which proves that the actual edge has not yet touched the stone. [56] We are tempted to lift the right hand ever so little, and so get rid of this bright rim (sometimes called the "candle"); we shall thus get an edge quicker than if we have to rub away all the steel behind it. We do this, and soon get our edge; the bright rim has disappeared, but we have done an unwise thing, and have not saved much time, because we have begun to make a rounded edge, which, if carried a little farther, will make the tool useless until it is reground. There is no help for it: time must be spent and trouble taken in sharpening tools; with method and care there need be very little grinding, unless tools are actually broken.
To resume our lesson in tool-sharpening: we can not do much carving with one chisel, so we shall now take up gouge No. 2 as being the least difficult. This being a rounded tool, we must turn the stone over and use the side we have determined to keep for gouges, etc. We commence rubbing it up and down the stone in the same manner as described for the chisel, but, in addition, we have now another motion. To bring all the parts of the edge into contact with the stone the gouge must be rolled from side to side [57] as it goes up and down. To accomplish this the wrist should be slowly practised until it gets into step with the up and down motions; it matters very little whether one turn of the tool is given to one passage along the stone, or only one turn to many up and down rubbings. The main thing is evenness of rubbing all along the circular edge, as if one part gets more than its share the edge becomes wavy, which is a thing to be avoided as much as possible. When the outside has been cleanly rubbed up to the edge, the inside [58] is to be rubbed out with the Washita slip and oil to the extent of about half as much as the outside. The handle of the tool should be grasped in the left hand, while its blade rests on a block of wood, or on the oilstone. Hold the slip between the fingers and thumb, slanting a little over the inner edge; and work it in a series of short downward strokes, beginning the stroke at one corner of the gouge and leaving off at the other (see Fig. 10). Strop the outside of the tool, and test for burr, then lay the leather over the handle of another tool and strop the inside, repeating the operation until all burr has been removed, when probably the tool will be ready for use.
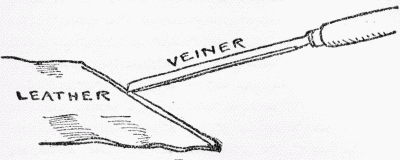
The Veiner requires the same kind of treatment, only as this tool is not part of a circle in its section (having straight sides), only one-half must be done at a time; and it is as well to give the straight sides one stroke or so in every half-dozen all to itself to keep it in shape. Care must be taken with this tool as it is easily rubbed out of shape. The inside must be finished off with the Arkansas knife-edged slip, one side at a time, as it is impossible to sweep out the whole section of these [59] deep tools at one stroke. Stropping must follow as before, but as this tool is so small that the leather will not enter its hollow, the leather must be laid down flat and the hollow of the tool drawn along its edge until it makes a little ridge for itself which fills the hollow and clears off burr (see Fig. 11); if any such adheres outside, a slight rub on the Arkansas stone will probably remove it. When the edges of the tools begin to get dull, it often happens that they only require to be stropped, which should be frequently done. As the treatment of all gouges is more or less like what has been described, practise will enable the student to adapt it to the shape of the tool which requires his attention. There remains only the V tool, the Spoon tools, and the Maccaroni, which all require special attention. The point of the V [60] tool is so acute that it becomes difficult to clear the inside. A knife-edged slip is used for this purpose, and it is well also to cut a slip of wood to a thin edge, and after rubbing it with paste and oil, pass it down frequently over the point between the sides. Unless a very sharp point is obtained, this tool is practically useless; the least speck of burr or dullness will stop its progress or tear up the wood. In sharpening it, the sides should be pressed firmly on the stone, watching it every now and then to see what effect is being produced. If a gap begins to appear on one side, as it often does, then rub the other side until it disappears, taking care to bear more heavily on the point of the tool than elsewhere. If the sides get out of shape, pass the tool along the stone, holding it at right angles to the side of the stone, but at the proper angle of elevation; in this case the tool is held near its end, between fingers and thumb. Spoon tools must be held to the stone at a much higher angle until the cutting edge is in the right relation to the surface, or they may be drawn sidewise along it, taking care that every part of the edge comes in contact and receives an equal amount of [61] rubbing. These may be treated half at a time, or all round, according to the size and depth of the tool. However it is produced, the one thing essential is a long straight-sectioned cutting bevel, not a rounded or obtuse one. Strop the inside by folding up the leather into a little roll or ball until it fills the hollow of the tool.
For the small set of tools described in Chapter II one flat oilstone and two slips will be found sufficient for a beginning, but as a matter of fact, it will be advisable, as the number of tools is enlarged, to obtain slips of curves corresponding to the hollows of all gouges as nearly as possible. Many professional carvers have sets of these slips for the insides of tools, varying in curves which exactly fit every hollow tool they possess, including a triangular one for the inside of the V tool. The same rule sometimes applies to the sweeps of the outsides of gouges, for these, corresponding channels are ground out in flat stones, a process which is both difficult and laborious. If the insides are dealt with on fitting slips, which may be easily adapted to the purpose by application to a grindstone, the outsides are not [62] so difficult to manage, so that grooved stones may be dispensed with.
Before we leave the subject of sharpening tools it will be well to impress upon the beginner the extreme importance of keeping his tools in good order. When a tool is really sharp it whistles as it works; a dull tool makes dull work, and the carver loses both time and temper. There can be no doubt that the great technical skill shown in the works of Grinling Gibbons and his followers could not have been arrived at without the help of extraordinarily sharp tools. Tools not merely sharpened and then used until they became dull, but tools that were always sharp, and never allowed to approach dullness. Sharpening tools is indeed an art in itself, and like other arts has its votaries, who successfully conquer its difficulties with apparent ease, while others are baffled at every point. Impatience is the stumbling-block in such operations. Those most painstaking people, the Chinese, according to all accounts, put magic into their sharpening stones; the keenness of their blades being only equaled by that of their wits in all such matters of delicate application. To make a good beginning is [63] a great point gained. To carefully examine every tool, and at the expense of time correct the faults of management, is the only way to become expert in sharpening tools.


|
INFORMATION ABOUT HOW TO MAKE MONEY FROM WOOD CARVING |