Wood Carving Tools
CHAPTER II
TOOLS
Average Number of Tools required by Carvers - Selection for Beginners - Description of Tools - Position when in Use - Acquisition by Degrees.

CLICK HERE CLICK HERE We will suppose that the student is anxious to make a practical commencement to his studies. The first consideration will be to procure a set of tools, and we propose in this place to describe those which will answer the purposes of a beginner, as well as to look generally at others in common use among craftsmen.
The tools used by carvers consist for the most part of chisels and gouges of different shapes and sizes. The number of tools required by professional carvers for one piece of work varies in proportion to the elaborateness of the carving to be done. They may use from half a dozen on simple work up to twenty or thirty for the [32] more intricate carvings, this number being a selection out of a larger stock reaching perhaps as many as a hundred or more. Many of these tools vary only in size and sweep of cutting edge. Thus, chisels and gouges are to be had ranging from 1/16th of an inch to 1 inch wide, with curves or "sweeps" in each size graduated between a semicircle to a curve almost flat. Few carvers, however, possess such a complete stock of tools as would be represented by one of each size and shape manufactured; such a thing is not required: an average number of, say seventy tools, will always give a sufficient variety of size and sweep for general purposes; few pieces of work will require the use of more than half of these in its execution.
The beginner, however, need not possess more than from twelve to twenty-four, and may even make a start with fewer. It is a good plan to learn the uses of a few tools before acquiring a complete set, as by this means, when difficulties are felt in the execution of work, a tool of known description is sought for and purchased with a foreknowledge of its advantages. This is the surest way to gain a distinct knowledge of the varieties of each kind of tool, and [33] their application to the different purposes of design.
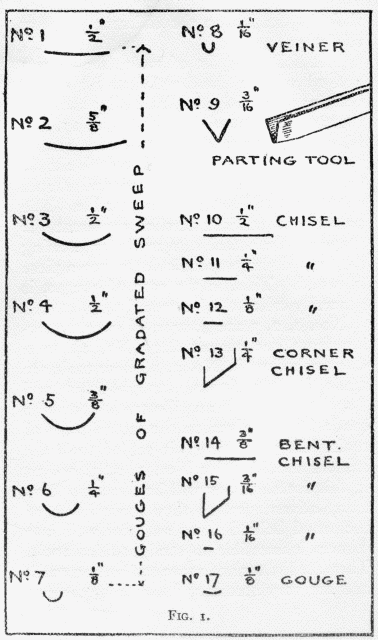
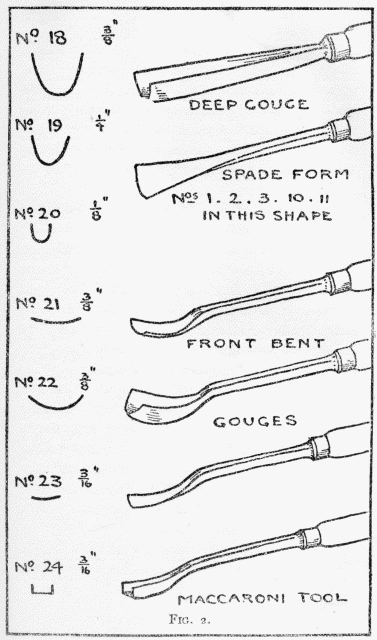
The following list of tools (see Figs. 1 and 2) will be found sufficient for all the occasions of study: beginning by the purchase of the first section, Nos. 1 to 17, and adding others one by one until a set is made up of twenty-four tools. The tools should be selected as near the sizes and shapes shown in the illustration as possible. The curved and straight strokes represent the shape of the actual cuts made by pressing the tools down perpendicularly into a piece of wood. This, in the case of gouges, is generally called the "sweep."
Nos. 1, 2, 3 are gouges, or sweeps varying from one almost flat (No. 1) to a distinct hollow in No. 3. These tools are made in two forms, straight-sided and "spade"-shaped; an illustration of the spade form is given on the second page of tools. In purchasing his set of tools the student should order Nos. 1, 2, 3, 10, 11 in this form. They will be found to have many advantages, as they conceal less of the wood behind them and get well into corners inaccessible to straight-sided tools. They are lighter and more easily sharpened, and are very necessary in finishing the surface of work, and in shaping out foliage, more especially such as is undercut. [34]
Nos. 5, 6, 7 are straight gouges graduated in size and sweep. No. 8 is called a Veiner, because it is often used for making the grooves which represent veins in leaves. It is a narrow but deep gouge, and is used for any narrow grooves which may be required, and for outlining the drawing at starting.
No. 9 is called a V tool or "parting" tool, on account of its shape. It is used for making grooves with straight sides and sharp inner angles at the bottom. It can be used for various purposes, such as undercutting, clearing out sharply defined angles, outlining the drawing, etc., etc. It should be got with a square cutting edge, not beveled off as some are made. Nos. 10, 11, 12 are flat chisels, or, as they are sometimes called, "firmers." (Nos. 10 and 11 should be in spade shape.) No. 13 is also a flat chisel, but it is beveled off to a point, and is called a "corner-chisel"; it is used for getting into difficult corners, and is a most useful tool when used as a knife for delicate edges or curves.
A special tool that the traveling woodcarver may want to have is the woodcarving jackkife.
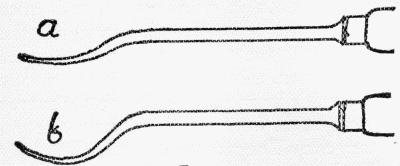
Nos. 14 and 16 are what are known as "bent chisels"; they are used principally [37] for leveling the ground (or background), and are therefore also called "grounders." These tools are made with various curves or bends in their length, but for our present uses one with a bend like that shown to tool No. 23, Fig. 2, and at a in Fig. 3, will be best; more bend, as at b, would only make the tool unfit for leveling purposes on a flat ground.
No. 15 is a similar tool, but called a "corner grounder," as it is beveled off like a corner-chisel.
No. 17 is an additional gouge of very slow sweep and small size. This is a very handy little tool, and serves a variety of purposes when you come to finishing the surface.
These seventeen tools will make up a very useful set for the beginner, and should serve him for a long time, or at least until he really begins to feel the want of others; then he may get the remainder shown on Fig. 2.
Nos. 18, 19, 20 are deep gouges, having somewhat straight sides; they are used where grooves are set deeply, and when they are required to change in section from deep and narrow to wide and shallow. This is done by turning the [38] tool on its side, which brings the flatter sweep into action, thus changing the shape of the hollow. Nos. 21, 22 are gouges, but are called "bent gouges"—"front bent" in this case, "back bent" when the cutting "sweep" is turned upside down. It is advisable when selecting these tools to get them as shown in the illustration, with a very easy curve in their bend; they are more generally useful so, as quick bends are only good for very deep hollows. These tools are used for making grooves in hollow places where an ordinary gouge will not work, owing to its meeting the opposing fiber of the wood.
No. 23 is a similar tool, but very "easy" both in its "sweep" and bend—the sweep should be little more than recognizable as a curve. This tool may be used as a grounder when the wood is slightly hollow, or liable to tear up under the flat grounder.
No. 24 is called a "Maccaroni" tool. This is used for clearing out the ground close against leaves or other projections; as it has two square sides it can be used right and left.
In the illustration, Fig 3, a shows the best form of grounding tool; b is little [39] or no use for this purpose, as it curves up too suddenly for work on a flat ground. It is a good thing to have the handles of tools made of different colored woods, as it assists the carver in picking them out quickly from those lying ready for use.
When in use, the tools should be laid out in front of the carver if possible, and with their points toward him, in order that he may see the shape and choose quickly the one he wants.
The tempering of tools is a very important factor in their efficiency. It is only of too common occurrence to find many of the tools manufactured of late years unfit for use on account of their softness of metal. There is nothing more vexatious to a carver than working with a [40] tool which turns over its cutting edge, even in soft wood; such tools should be returned to the agent who sold them.
With a selection from the above tools, acquired by degrees in the manner described, almost any kind of work may be done. There is no need whatever to have a tool for every curve of the design. These can readily be made by using straight chisels in combination with such gouges as we possess, or by sweeping the curves along their sides with a chisel used knife fashion. No really beautiful curves can be made by merely following the curves of gouges, however various their sweeps, as they are all segments of circles.
Tools generally come from the manufacturer ground, but not sharpened. As the student must in any case learn how to sharpen his tools, it will be just as well to get them in that way rather than ready for use. As this process of sharpening tools is a very important one, it must be reserved for another place. Should tools be seriously blunted or broken they must be reground. This can be done by the carver, either on a grindstone or a piece of gritty York stone, care being taken to repeat the original bevel; or they may be sent to a tool [41] shop where they are in the habit of grinding carving tools.
Catalogues of tools may be had from good makers; they will be found to consist mainly in a large variety of the tools already mentioned. Those which are very much bent or curved are intended for special application to elaborate and difficult passages in carving, and need not concern the student until he comes to find the actual want of such shapes; such, for instance, as bent parting tools and back bent gouges.
In addition to the above tools, carvers occasionally use one called a "Router." This is a kind of plane with a narrow perpendicular blade. It is used for digging or "routing" out the wood in places where it is to be sunk to form a ground. It is not a tool to be recommended for the use of beginners, who should learn to make sufficiently even backgrounds without the aid of mechanical contrivances.
Carvers also use the "Rifler," which is a bent file. This is useful for very fine work in hard wood, and also for roughly approximating to rounded forms before finishing with the tools.
A few joiner's [carpenter's] tools are very useful to [42] the carver, and should form part of his equipment. A wide chisel, say about 1-1/4 in. wide, a small iron "bull-nose" plane, and a keyhole saw, will all be helpful, and save a lot of unnecessary labor with the carving tools.


