CHAPTER XVIII
CARVING ON FURNITURE
Furniture Constructed with a View to Carving - Reciprocal Aims of Joiner and Carver - Smoothness Desirable where Carving is Handled - The Introduction of Animals or Figures.
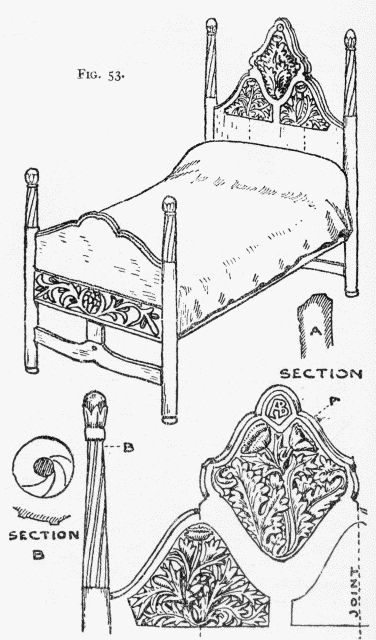
You will find in the illustrations, Figs. 53 to 62, certain suggestions for various pieces of furniture. They are given with the intention of impressing upon you the fact that very little carving can be done at all without some practical motive as a backbone to your fancies. To be always carving inapplicable panels is very dull work, and only good for a few preliminary exercises.
It is much better to consider the matter well, and resolve upon some "opus," which will spread your efforts over a considerable period. When you have decided upon the piece
of furniture which is most likely to be useful to you, and [163] which lies within your powers of design and execution, then make a drawing for it, and have it made by a joiner (unless you can make it entirely yourself), to be put together in loose pieces for convenience of carving, and glued up when that is finished. You should certainly design the piece yourself, as you should make all your own designs for the carving. The two departments must be carried on in the closest relation to each other while the work is in progress, otherwise their association will not be complete when it is finished.
Take, for instance, the head of the bed in the illustration. Why should it stand up so high, like the gable of a house? It is for no other reason than to give an opportunity for carving. A plain board of half the height would have been just as effective as a protection to the sleeper. Useless as carving may be from this practical point of view, it must nevertheless be amenable to utilitarian laws. It must be smooth where it is likely to be handled, as in the case of the knobs on top of the posts; and even where it is not likely to be handled, but may be merely touched occasionally, it should still have an inviting smoothness of surface. As a [164] matter of fact, all carving on a bed should be of this kind, with no deep nooks or corners to hold dust. Here, then, are a number of conditions, which, instead of being a hindrance, are really useful incentives to fresh invention. Just as the construction of joiner's work entails concessions on the part of the carver, so the carver may ask the joiner to go a little out of his way in order to give opportunities for his carving. A little knowledge of this subject will make a reasonable compromise possible.
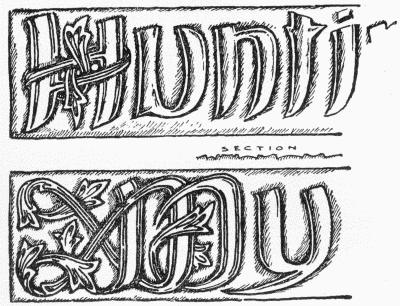
You will find a further advantage in undertaking a fairly large piece of work. As it is almost certain to be in several parts, each may thus receive a different treatment, by which means you not only obtain contrast, but get some idea of the extraordinary power with which one piece of carving affects another when placed in juxtaposition. Whatever designs you may decide upon, should you undertake to carve the panels for a bed, let them be in decidedly low relief. The surface must be smoothly wrought, doing away with as much of the tool marking as you can, but this smoothing to be done entirely with the tools, not by any means with glass [165] paper. Great attention must be paid to the drawing of the forms, as it is by this that the impression of modeling and projection will be expressed. A very pleasant treatment of such low relief when a smooth and even appearance is wanted, is to carve the ground to the full depth, say 1/8 in., only along the outlines of the design, and form the remainder into a kind of raised cushion, almost level in the middle with the original surface of the wood. The whole design need thus be little more than a kind of deepish [166] engraving, depending for its effect upon broad lights defined by the engraved shadows. See Fig. 54 for an example of this treatment applied to letters.
Now I expect you to make a fresh design. The illustrations in all such cases are purposely drawn in a somewhat indefinite way, in order that they may suggest, without making it possible to copy.
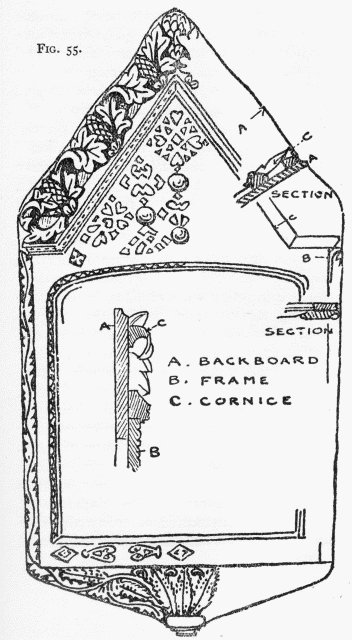
Now we come to the mirror frame, Fig. 55. I should suggest that this be done in some light-colored wood like pear-tree, which has an agreeably warm tone, or if a hard piece of cedar can be found, it would look well, but in no case should polish be added except that which comes from the tool. The construction need not be complicated. Take two 3/4-in. boards, glue them together to form the width, shape out the frame in the rough. Put behind this another frame of 3/4-in. thick stuff, and make the cornice out of wood about 1-1/2 in. thick. The parts to be kept separate until the carving is finished, and afterward glued or screwed together. The carving on the body of the frame, that is, in the gable above and the front of bracket below, should be in very [168] low relief, the lower part being like the last, a kind of engraving. The fret above may be sunk about 1/16 in. and the ground slightly cushioned. The carving on sides and cornice is of a stronger character, and may be cut as deeply as the wood will allow, while the cornice is actually pierced through in places, showing the flat board behind. The design for this cornice should have some repeating object, such as the kind of pineapple-looking thing in the illustration, and its foliage should be formed with plenty of well-rounded surfaces, that may suggest some rather fat and juicy plant.
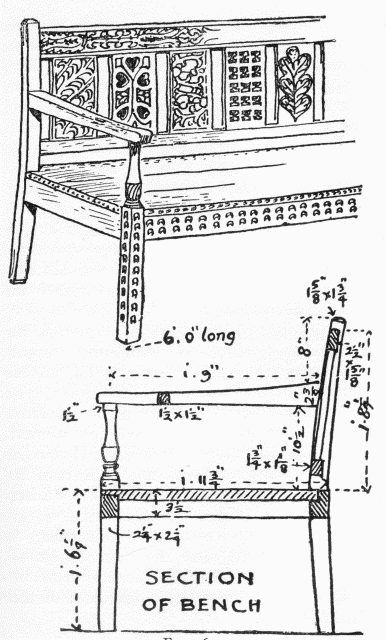
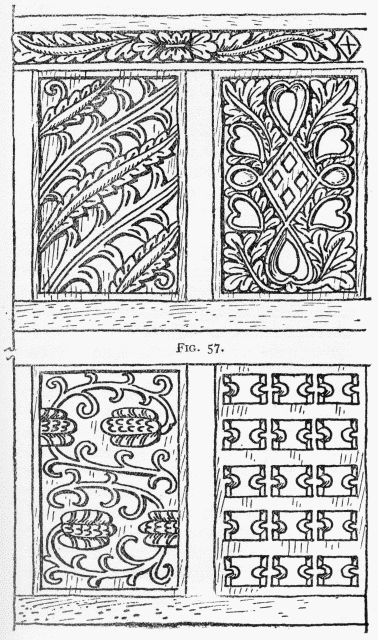
In Fig. 56 you have a suggestion for carving a bench or settle, the proportions of which have been taken from one found at a Yorkshire village inn. The actual measurements are given in order that these proportions may be followed. It is a well-known fact, that chairs, or seats of any kind, can not be successfully designed on paper with any hope of meeting the essential requirements of comfort, lightness, and stability. Making seats is a practical art, and the development of the design is a matter of many years of successive improvements. A good model [170] should therefore be selected and copied, with such slight changes as are necessary where carving is to be introduced. The main lines should not be interfered with on any account, nor should the thickness of the wood be altered if possible. The carving on this settle is intended to be in separate panels, about two inches apart. These panels will look all the better if no two are quite alike; a good way to give them more variety will be to make every alternate one of some kind of open pattern, like a fret. These piercings need not extend all over the design in the panel in every case: some may have only a few shapely holes mixed up with the lines, others again may be formed into complete frets with as much open as solid. (See Fig. 57.)
The carving should be shallow, and not too fine in detail, as it will get a great deal of rubbing. The material should be, if possible, oak; but beech may be used with very good effect—in neither case should it be stained or polished.
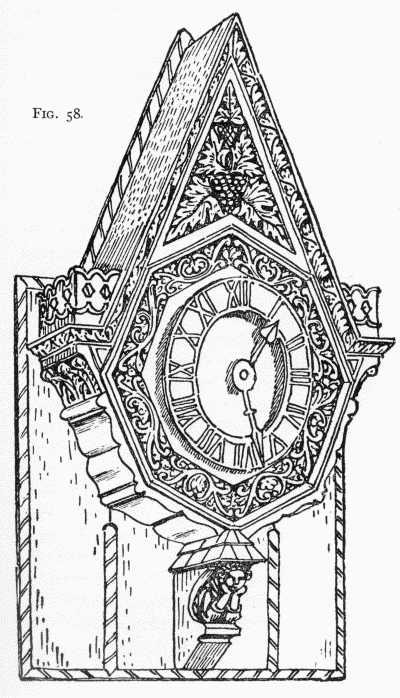
Fig. 58 is a clock case. Something of this kind would make an excellent "opus" such as I have alluded to, and give plenty of scope for invention. As clocks of this [172] kind are generally hung on a wall, the brackets, from a practical point of view, are of course unnecessary, but as it is important that they should look as if they were supported and to satisfy the eye, something in the way of a bracket or brackets is generally added. A bracket like the one in the illustration, not being a real support constructively speaking, but only put there to give assurance that such has not been overlooked or neglected, becomes a kind of toy, and may be treated as such by adding some little fancy to make it amusing, and give an excuse for making a feature of it. This will be a good place to try your hand at some modest attempt at figure work. In designing your bracket, should you wish to introduce a little figure of man or beast, I think you will find it more satisfactory if the figure is separated from the structural part by a slight suggestion of solid surroundings of its own. Thus the little roof over, and the solid bit of wood under, the figure in the illustration serve this purpose, lending an appearance of steadiness which would be wanting in a bracket formed of a detached figure. At any rate, never make your figures, whether of man [174] or beast, seem to carry the clock; you may hunch them up into any shape you like, but no weight should be supposed to rest upon them.
For sake of the carving, oak will be the best wood to employ in making this clock, or one like it, but Italian walnut will do equally well. The size should be fairly large, say about three feet over all in height. This will give a face of about ten inches in diameter, which face will look best if made of copper gilt, and not much of it, perhaps a mere ring, with the figures either raised or cut out, leaving nothing but themselves and two rings surrounding. This should project from the wood, leaving a space of about one inch.
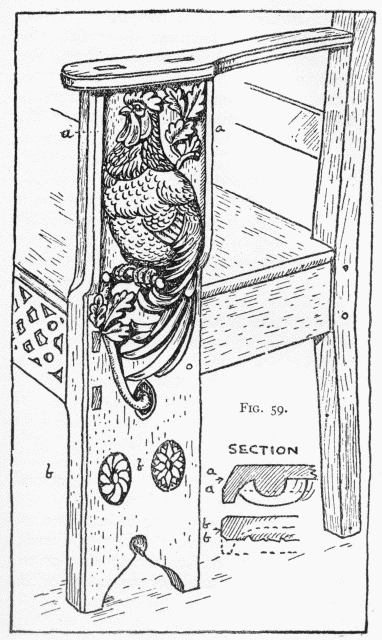
If you are inclined to try a heavier piece of work, the bench or settle-end in Fig. 59 may give you a suggestion. In this there is a bird introduced in the shape of a cock roosting on the branch of a tree. It would require to be done in a thick piece of wood, say 3 ins. thick, and would be best in English oak. The idea will be, to cut away the wood from the outer lower portion, leaving only about 1-1/4 or 1-1/2 in. thickness, but at the top retaining the full thickness; in which the [176] bird must be carved, the outer edges being kept full thickness in order to give the structural form and enclose the carving. The inside of this upper part, toward the seat, should also be carved, but with a smooth and shallow pattern of some kind, as both may be seen together, and in contrast to each other.
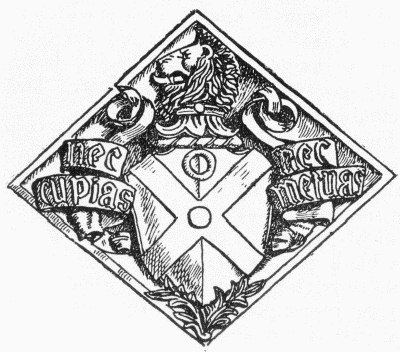
The introduction of figures leads me to a subject which it will be better to discuss in the next chapter, i.e., the question as to how far it is possible or consistent with [177] present conditions to attempt anything that may bear the character of humor. But in the meantime here are three more subjects upon which fancy and ingenuity may be expended with profit. In Fig. 60 you have a heraldic subject. In all such cases the heraldry should be true, and not of the "bogus" kind. This shield represents a real coat of arms, and was done from a design by Philip Webb, being finally covered with gesso, silvered and painted in transparent colors.
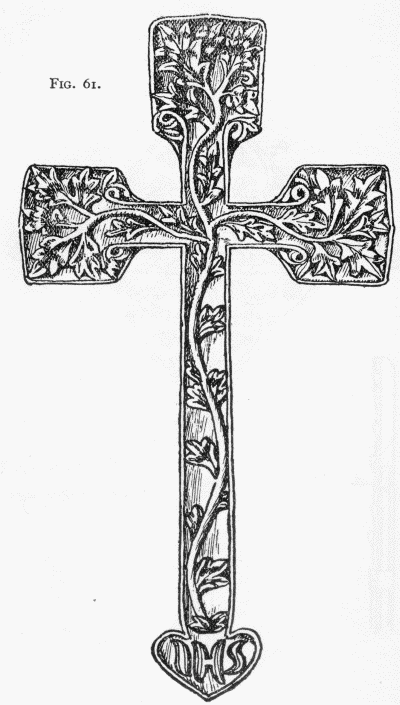
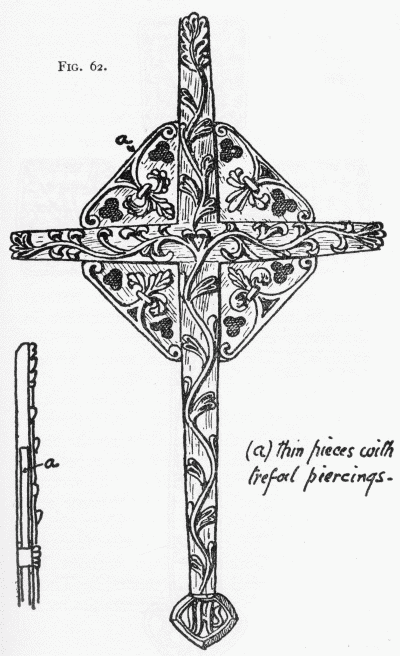
Figs. 61 and 62 are suggestions for wooden crosses, oak being the best material to use for such a purpose. The carving should be so arranged as to form some kind of pattern on the cross. In Fig. 62 the black trefoils are supposed to be cut right through the thin pieces of wood forming the center portion, and the carving on that part is very shallow. [178]
[179]
WOODCARVING BOOK - TABLE OF CONTENTS | WOODCARVING BOOK - INDEX OF TOPICS

|
INFORMATION ABOUT HOW TO MAKE MONEY FROM WOOD CARVING |
