MISSION FURNITURE
MAKE MONEY FLIPPING FURNITURE
If youre looking for a home business that can return you a profit in as little as 24 hours, then flipping furniture for profit will shock you!
REVIEW OF TED'S WOOD-
WORKING
WOOD WORKING FOR BEGINNERS
BED HARDWARE

|
A BEDSIDE MEDICINE STAND
The accompanying sketch and detail drawing show a design of a bedside stand. This is a very desirable piece of furniture and is simple and easy to make. Quarter-sawed oak is the best wood to
use in its construction. The material should be ordered from the mill ready cut to length, squared and sanded. The following list of material will be required:
- 4 posts, 1-3/4 by 1-3/4 by 33 in., S-4-S.
- 1 top board, 1 by 19 by 19 in., S-4-S.
- 3 intermediate boards, 3/4 by 15-1/2 by 17 in., S-4-S.
- 2 side boards, 3/4 by 5 by 15-1/2 in., S-4-S.
- 1 back board, 3/4 by 4-1/4 by 14-1/2 in., S-4-S.
- 4 side rails, 3/4 by 2 by 16 in., S-4-S.
- 1 door, 3/4 by 9 by 14-1/2 in., S-4-S.
- 1 back board, 3/4 by 10-1/4 by 14-1/2 in., S-4-S.
- 2 panels, 3/8 by 9-1/2 by 15 in., S-4-S.
- 6 slats, 1/4 by 1 by 8-3/4 in., S-4-S.
- 1 drawer front, 3/4 by 4-1/4 by 14-1/2 in., S-4-S.
- 2 sides for drawer, 1/2 by 4-1/4 by 16 in., S-4-S.
- 1 back for drawer, 1/2 by 4-1/4 by 13-1/2 in., soft wood.
- 1 bottom for drawer, 1/2 by 13-1/2 by 15 in., soft wood.
 Medicine Stand in Quarter-Sawed Oak
Start work on the four posts by rounding the top corners and shaping the feet as shown. The four posts are identical and the mortises should be
laid out on all four at once so as to get them all alike. These should be carefully cut with a sharp chisel. On the inner surface of each leg
cut a groove to hold the side boards of the lower compartment.
Next prepare the two wide and the four narrow crosspieces, tenoning them to fit the mortises already cut in the legs. The lower crosspieces
should also have grooves cut in them to hold the side boards of the compartment. The two complete sides can now be glued and clamped
together and set away to dry. While they are drying the remaining parts of the stand can be made. The three horizontal boards are now made by
notching out the corners to fit around the legs. They are supported by fastening small cleats to the inner surface of each crosspiece.
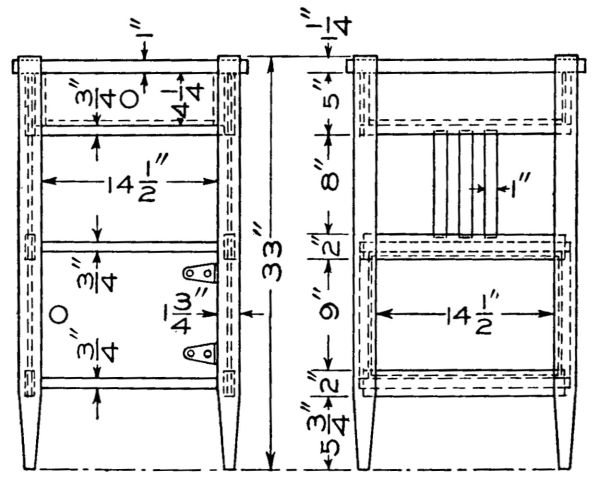 Detail of the Medicine Stand
The two ends can now be set up and connected. Notch out the corners of the top board and fit it in place. The top is fastened down using screws set at an angle from below. The back boards can be constructed of softer wood and are fastened in place in the usual manner. The door should be made of one piece if possible and should have suitable hinges and catches.
Make and fit the drawer in place, and the stand is ready for the finish. First scrape all the surplus glue from about the points so the stain will set on the wood. Finish smoothing with fine sandpaper, then apply stain of the desired color.
|
