A simple design for a hall or window seat is shown in the accompanying
sketch and detail drawing. Anyone who has a few sharp tools, and is at
all handy with them, can make this useful and attractive piece of
furniture in a few spare hours. Quarter-sawed oak is the best wood
to use in its construction, as it looks best when finished and is easy
to procure. If the stock is ordered from the mill ready cut to length,
squared and sanded, much of the labor will be saved. The following is a
list of the material needed:
- 4 corner posts, 1-1/2 by 1-1/2 by 28 in., S-4-S.
- 2 side rails, 3/4 by 2-1/2 by 36-1/2 in., S-4-S.
- 2 end rails, 3/4 by 4 by 14-1/2 in., S-4-S.
- 2 side braces, 1 by 1 by 36-1/2 in., S-4-S.
- 2 end braces, 1 by 1 by 14-1/2 in. S-4-S.
- 1 seat, 1 by 16 by 35-3/4 in., S-4-S.
- 2 top end braces, 3/4 by 2 by 14-1/2 in., S-4-S.
- 6 slats, 3/4 by 2 by 6-1/2 in., S-4-S.
Square up the four posts and lay out the mortises according to the
drawing. To do this, lay them on a flat surface with the ends square and
mark them with a try-square. The tenons on the end and side rails are
laid out in the same manner as the posts. The end rails should be marked
and mortises cut for the upright slats as shown in the detail drawing.
Fit the end and side braces with mortise and tenon joints.
The two end frames can now be glued and clamped together and set away to
dry. Put all the parts together before gluing to see that they fit
square and tight.
The seat should be made of one piece if possible, otherwise two or more
boards will have to be glued together. The corners should be cut out to
fit around the posts. It rests on the side rails and cleats fastened to
the inner side of the end rails.
When the window seat is complete go over it carefully and scrape all the
surplus glue from about the joints, as the finish will not take where
there is any glue. Remove all rough spots with fine sandpaper, then apply the stain best liked,
which may be any one of the many mission stains supplied by the trade
for this purpose. If this window seat is well made and finished, it will
be an ornament to any home.


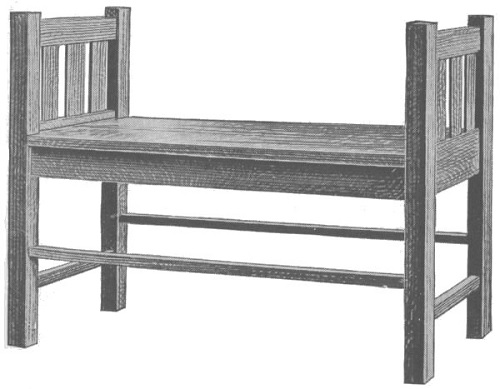 Seat Made of Quarter-Sawed Oak
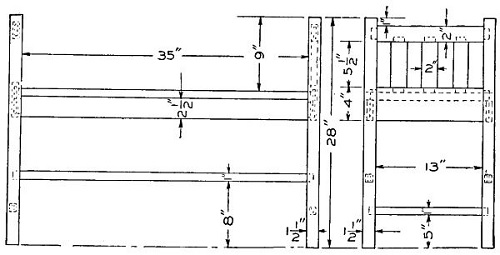 Detail of the Hall or Window Seat