MISSION FURNITURE
REVIEW OF TED'S WOOD-
WORKING
WOOD WORKING FOR BEGINNERS

|
A MISSION SIDEBOARD
Oak is the most suitable material for making this sideboard and it should be first-class stock, planed and cut to the dimensions given in the following list:
- 1 top, 7/8 by 22 by 48 in., S-2-S.
- 1 top shelf, 7/8 by 12 by 48 in., S-2-S.
- 1 bottom, 7/8 by 22 by 48 in., S-2-S.
- 2 back posts, 2 by 2 by 57 in., S-4-S.
- 2 front posts, 2 by 2 by 36 in., S-4-S.
- 2 standards, 2 by 2 by 20 in., S-4-S.
- 2 mirror rails, 7/8 by 2 by 47 in., S-2-S.
- 2 mirror rails, 7/8 by 2 by 20 in., S-2-S.
- 3 front and back rails, 7/8 by 3 by 46 in., S-2-S.
- 4 end rails, 7/8 by 3 by 20 in., S-2-S.
- 4 standard rails, 7/8 by 2 by 10 in., S-2-S.
- 2 vertical pieces, 7/8 by 19-1/2 by 22 in., S-2-S.
- 1 horizontal piece, 7/8 by 22 by 14-1/4 in., S-2-S.
- 1 drawer front, 7/8 by 6 by 14-1/4 in., S-2-S.
- 1 piece, 7/8 by 3 by 3 in.
- 4 vertical door pieces, 7/8 by 2 by 17 in., S-2-S.
- 4 horizontal door pieces, 7/8 by 2 by 15 in., S-2-S.
- 2 drawer sides, 7/8 by 5 by 14 in., S-2-S.
- 1 drawer bottom, 1/4 by 14 by 14-1/4 in., S-2-S.
- 1 back panel, 1/4 by 16-1/2 by 44-1/2 in., S-2-S.
- 2 door panels, 1/4 by 10-1/2 by 15-1/2 in., S-2-S.
- 2 side panels, 1/4 by 18-1/2 by 16-1/2 in., S-2-S.
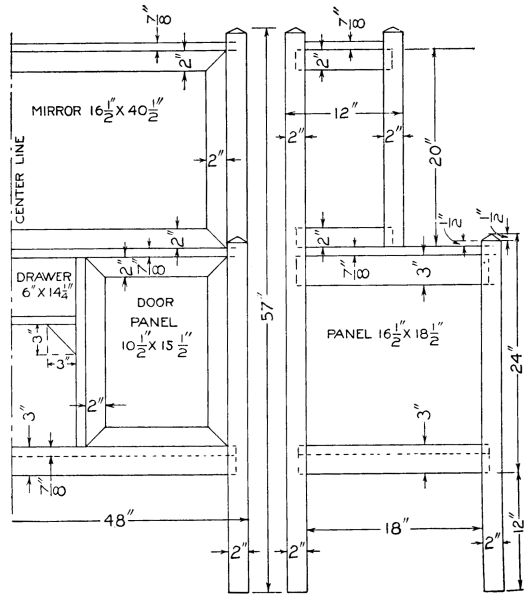 Detail of the Mission Sideboard
Begin work by cutting the posts to the length indicated in the detail
drawing. The top ends are tapered with a 1/2-in. slant. These posts are
cut in pairs and it is best to stand them up in the same[105] position they will be in the
finished sideboard, and mark the sides to be mortised with a pencil.
Also cut the grooves into which the panels are to fit. These are to be
1/4 in. wide and a little over 1/4 in. deep.
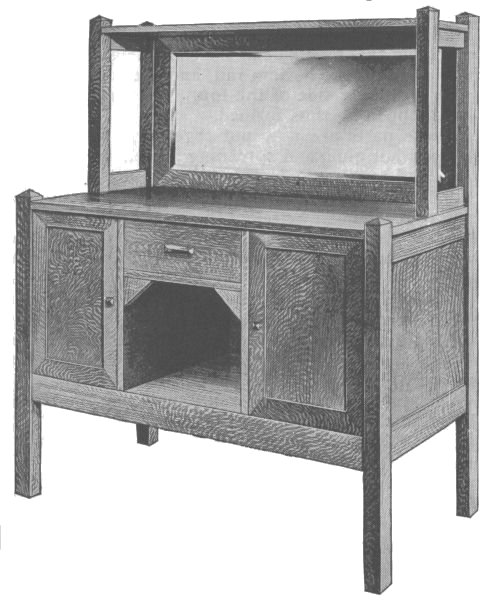 Mission Sideboard in Quarter-Sawed Oak
[106]
The rails are cut with tenon ends to match the mortises, and also have
grooves to receive the panels.
The bottom part of the back is closed with a panel and two rails, one at
the same height from the floor as the front bottom rail, and the top one
even with the under side of the top. The large panel is for the opening
thus formed.
These parts are now put together, using plenty of good hot glue, and spreading it well on the mortises and tenon ends.
When drawing the frame together with the clamps, care must be taken to get it square.
After the glue is hard enough to remove the clamps, the top and bottom
are put in place. The corners of the top are notched out to fit around
the posts, while the bottom is cut to fit on the inside of the rails and
is held in place by putting screws in at an angle through the bottom
into the rails. The top is also fastened in this way, except that the
screws are run through the rails into the top.
The two vertical pieces are now put in place. Drive nails through the bottom and into these pieces. On the top end use screws driven at an angle. Glue may be used if desired.
The doors are made to match these openings. The corners are mitered and the backs rabbeted to receive the panels. These panels may be made in art glass if so desired.
The horizontal piece for the drawer to rest upon is now put in place and fastened by driving nails through the vertical pieces. The drawer is
made to fit this opening, and it should be lined with velvet to keep the silverware in good condition.
The standards and shelves are put on as shown in the drawing. The mirror is put in a frame, which
is made to fit the back opening and has the corners mitered and the back rabbeted to receive the mirror.
Thoroughly scrape and sandpaper all parts that are visible. The sideboard is now ready to be finished as desired.
|
